
I would be sharing the steps for creating your multinode Oracle Apps R12 Lab in 2 parts, Because of its length. Also, will stop the DB node with its default 10G database in this particular post. This post was drafted long back, but never published, which I am doing now. Hopefully, this helps you creating your dream machine.
I created my lab using these steps, the screenshots are values in some places may seem to be irrelavant, But you need to identify the corrections needed as you follow the steps, Because I gathered these informations from various blogs and documents in bits and pieces and tailored into one, So that, I could finish the job in one go!!
Note:- This "job in 1 go" means 2 weeks of continuous work, and for shared storage setup alone, I had to spent almost 48 Hrs continously, Since, I was never having knowledge beyond Oracle Apps/ Oracle Database software installation and managing it. The most challenging part for me in this whole episode was shared storage setup using Openfiler and this was about 2 years ago from now. After this excercise, I got the idea on how iSCSI storage is setup for large infrastructures.
1.1 Desktops – (DELL Optiplex 755) – 5 No’s
2.1 Disk Partitioning Setup
2.2 Partitioning
2.3 Boot Loader Configuration
2.4 Network Configuration
2.5 Package Installation Defaults
2.6 Firewall
2.7 Create User
2.8 Perform the same installation on the
second node
3.1 64-bit (x86_64) Installations
4.1 Introduction to Network Settings
4.2 Configuring Public and Private Network
4.3 About Virtual IP
4.4 Confirm the RAC Node Name is Not Listed in
Loopback Address
4.5 Confirm localhost is defined in the
/etc/hosts file for the loopback address
4.6 Adjusting Network Settings
4.7 Check and turn off UDP ICMP rejections:
5.1 Install Openfiler
5.2 Boot Screen
5.3 Media Test
5.4 Welcome to Openfiler NSA
5.5 Keyboard Configuration
5.6 Disk Partitioning Setup
5.7 Automatic Partitioning
5.8 Partitioning
5.9 Network Configuration
5.10 Modify /etc/hosts File on Openfiler
Server
5.11 Configure iSCSI Volumes using Openfiler
5.12 Services
5.13 Network Access Configuration
5.14 Physical Storage
5.15 Partitioning the Physical Disk
5.16 Volume Group Management
5.17 Logical Volumes
5.18 iSCSI Targets
5.19 Create New Target IQN
5.20 LUN Mapping
5.21 Network ACL
5.22 Configure iSCSI Volumes on Oracle RAC
Nodes
5.23 Installing the iSCSI (initiator) service
5.24 Configure the iSCSI (initiator) service
5.25 Manually Log In to iSCSI Targets
5.26 Configure Automatic Log In
5.27 Create Persistent Local SCSI Device Names
5.28 Create Partitions on iSCSI Volumes
5.29 Verify New Partitions
7.1 R12 Installation (Initially 2 mid-tier
& 1 DB-tier node)
8.1 Check the hardware setup done previously
8.2 CRS Installation
8.3 Install Oracle DB 10.2.0.1 Binaries
8.4 Install Oracle DB Components from
Components CD
8.5 Upgrade CRS & Database software to
10.2.0.2
8.6 Upgrade the apps database to 10.2.0.2
(utlu102i.sql)
8.7 Listener Configuration
8.8 Create ASM Instance and ASM Diskgroups
8.9 Run DBCA to configure ASM instances
8.10 Prepare ConvertToRAC.xml using rconfig
8.11 Create a new spfile on ASM for
target(RAC) DB_Home
8.12 RUN rconfig
8.13 Enable Autoconfig on database tier
8.14 Run Autoconfig on database tier node-1
& node-2
8.15 Check database & nodeapps status
using srvctl
8.16 Establish application environment for RAC
1) Hardware configuration
1.1 Desktops – (DELL Optiplex 755) – 5 Nos


Node-1
& Node-2 For 2 Middle-tier nodes
Node-3 & Node-4 For 2 Database-tier
Nodes (For RAC)
Node-5
For shared storage using
iSCSI/Openfiler
Node-5 Two Physical disks (Internal
or External)
·
1st
SATA disk for operating system and Openfiler application,
·
2nd
SATA disk for as a single "Volume Group" to be used for all shared
disk storage requirements )
2) Install Linux OS and required (For DB
nodes)
Only the disk partitioning, NIC configuration portions while
installation are highlighted below
|
2.1 Disk Partitioning Setup
·
Select
[Remove all partitions on selected drives and create default layout]
·
Check the
option to [Review and modify partitioning layout].
·
Click
[Next] to continue.
You will then be prompted with a dialog window
asking if you really want to remove all Linux partitions.
·
Click
[Yes] to acknowledge this warning.
2.2 Partitioning
The installer will choose 100MB for /boot,
Double the amount of RAM (systems with >=
2,048MB RAM) or an amount equal to RAM (systems with < 2,048MB RAM) for
swap, and the rest going to the root (/) partition.
From RHEL 4, the installer will create the same
disk configuration as just noted but will create them using the Logical Volume
Manager (LVM).
For example, it will partition the first hard drive
(/dev/hda for my configuration) into two partitions —
One for the /boot partition (/dev/hda1) and the
remainder of the disk dedicate to a LVM named VolGroup00 (/dev/hda2).
The LVM Volume Group (VolGroup00) is then
partitioned into two LVM partitions - one for the root file system (/) and
another for swap.
The main concern during the partitioning phase is
to ensure enough swap space is allocated as required by Oracle (which is a
multiple of the available RAM). The following is Oracle's requirement for swap
space:
Available
RAM
|
Swap
Space Required
|
Between 1,024MB and 2,048MB
|
1.5 times the size of RAM
|
Between 2,049MB and 8,192MB
|
Equal to the size of RAM
|
More than 8,192MB
|
.75 times the size of RAM
|
For the purpose of this install, we will accept all
automatically preferred sizes. (Including 4,096MB for swap since we have
2,048MB of RAM installed.
Once you are satisfied with the disk layout, click
·
[Next] to
continue.
2.3 Boot Loader Configuration
The installer will use the GRUB boot loader by
default. To use the GRUB boot loader, accept all default values and click
[Next] to continue.
2.4 Network Configuration
This screen should have successfully detected each
of the network devices. Since we will be using this machine to host an Oracle
instance, there will be several changes that need to be made to the network
configuration. The settings you make here will, of course, depend on your
network configuration. The key point to make is that the machine should never
be configured with DHCP since it will be used to host an Oracle instance. You
will need to configure the machine with static IP addresses. You will also need
to configure the server with a real host name.
First, make sure that each of the network devices
are checked to [Active on boot]. The installer may choose to not activate eth1
by default.
Second,[Edit] both eth0 and eth1 as follows. Verify
that the option "Enable IPv4 support" is selected. Click off the
option to use "Dynamic IP configuration (DHCP)" by selecting the
"Manual configuration" radio button and configure a static IP address
and Netmask for your environment. Click off the option to "Enable IPv6
support". You may choose to use different IP addresses for both eth0 and
eth1 that we have documented in this guide and that is OK. Put eth1 (the interconnect)
on a different subnet than eth0 (the public network):
eth0:
- Check ON the option to [Enable IPv4 support]
- Check OFF the option to use [Dynamic IP configuration (DHCP)] - (select Manual configuration)
IPv4 Address: 192.168.1.100
Prefix (Netmask): 255.255.255.0
- Check OFF the option to [Enable IPv6 support]
- Check ON the option to [Enable IPv4 support]
- Check OFF the option to use [Dynamic IP configuration (DHCP)] - (select Manual configuration)
IPv4 Address: 192.168.1.100
Prefix (Netmask): 255.255.255.0
- Check OFF the option to [Enable IPv6 support]
eth1:
- Check ON the option to [Enable IPv4 support]
- Check OFF the option to use [Dynamic IP configuration (DHCP)] - (select Manual configuration)
IPv4 Address: 192.168.2.100
Prefix (Netmask): 255.255.255.0
- Check OFF the option to [Enable IPv6 support]
- Check ON the option to [Enable IPv4 support]
- Check OFF the option to use [Dynamic IP configuration (DHCP)] - (select Manual configuration)
IPv4 Address: 192.168.2.100
Prefix (Netmask): 255.255.255.0
- Check OFF the option to [Enable IPv6 support]
Continue by manually setting your hostname. We will
use "linux1" for the first node and "linux2" for the
second. Finish this dialog off by supplying your gateway and DNS servers.
2.5 Package Installation Defaults
·
Desktop Environments
o
GNOME
Desktop Environment
·
Applications
o
Editors
o
Graphical
Internet
o
Text-based
Internet
·
Development
o
Development
Libraries
o
Development
Tools
o
Legacy
Software Development
·
Servers
o
Server
Configuration Tools
·
Base System
o
Administration
Tools
o
Base
o
Java
o
Legacy
Software Support
o
System
Tools
o
X Window
System
In addition to the above packages, select any
additional packages you wish to install for this node keeping in mind to NOT
de-select any of the "default" RPM packages. After selecting the
packages to install click [Next] to continue.
2.6 Firewall
On this screen, make sure to select the [Disabled]
option and click [Forward] to continue.
You will be prompted with a warning dialog about
not setting the firewall. When this occurs, click [Yes] to continue.
2.7 Create User
Create any additional (non-oracle) operating system
user accounts if desired and click [Forward] to continue. For the purpose of
this article, We will not be creating any additional operating system accounts.
We will be creating the "oracle" user account during the Oracle
database installation later in this guide.
If you chose not to define any additional operating
system user accounts, click [Continue] to acknowledge the warning dialog.
2.8 Perform the same installation on the second node
After completing the Linux installation on the
first node, repeat the above steps for the second node (linux2).
eth0:
- Check ON the option to [Enable IPv4 support]
- Check OFF the option to [Use dynamic IP configuration (DHCP)] - (select Manual configuration)
IPv4 Address: 192.168.1.101
Prefix (Netmask): 255.255.255.0
- Check OFF the option to [Enable IPv6 support]
- Check ON the option to [Enable IPv4 support]
- Check OFF the option to [Use dynamic IP configuration (DHCP)] - (select Manual configuration)
IPv4 Address: 192.168.1.101
Prefix (Netmask): 255.255.255.0
- Check OFF the option to [Enable IPv6 support]
eth1:
- Check ON the option to [Enable IPv4 support]
- Check OFF the option to [Use dynamic IP configuration (DHCP)] - (select Manual configuration)
IPv4 Address: 192.168.2.101
Prefix (Netmask): 255.255.255.0
- Check OFF the option to [Enable IPv6 support]
- Check ON the option to [Enable IPv4 support]
- Check OFF the option to [Use dynamic IP configuration (DHCP)] - (select Manual configuration)
IPv4 Address: 192.168.2.101
Prefix (Netmask): 255.255.255.0
- Check OFF the option to [Enable IPv6 support]
3) Install Linux RPM’s for Oracle RAC
3.1 64-bit (x86_64) Installations
·
binutils-2.17.50.0.6-2.el5
·
compat-libstdc++-296-2.96-138
·
compat-libstdc++-33-3.2.3-61
·
compat-libstdc++-33-3.2.3-61 (32
bit)
·
elfutils-libelf-0.125-3.el5
·
elfutils-libelf-0.125-3.el5 (32 bit)
·
elfutils-libelf-devel-0.125
·
gcc-4.1.1
·
gcc-c++-4.1.1
·
glibc-2.5-12
·
glibc-2.5-12 (32 bit)
·
glibc-common-2.5
·
glibc-devel-2.5-12
·
glibc-devel-2.5-12 (32 bit)
·
glibc-headers-2.5-12
·
libaio-0.3.106
·
libaio-0.3.106 (32 bit)
·
libaio-devel-0.3.106
·
libgcc-4.1.1
·
libgcc-4.1.1 (32 bit)
·
libstdc++-4.1.1
·
libstdc++-4.1.1 (32 bit)
·
libstdc++-devel-4.1.1-52.e15
·
libXp-1.0.0-8
·
libXp-1.0.0-8 (32 bit)
·
make-3.81-1.1
·
openmotif-2.2.3
·
sysstat-7.0.0
·
unixODBC-2.2.11
·
unixODBC-2.2.11 (32 bit)
·
unixODBC-devel-2.2.11
Each
of the packages listed above can be found on CD #1, CD #2, CD #3, and CD #4 on
the Linux (x86_64) CDs. While it is possible to query each individual package
to determine which ones are missing and need to be installed, an easier method
is to run the rpm -Uvh PackageName command from the five CDs as follows.
For packages that already exist and are up to date, the RPM command will simply
ignore the install and print a warning message to the console that the package
is already installed.
4) Network Configuration
Although
we configured several of the network settings during the installation of OS, it
is important to not skip this section as it contains critical steps that are
required for a successful RAC environment.
4.1 Introduction to Network Settings
Both
of the Oracle RAC nodes should have one static IP address for the public
network and one static IP address for the private cluster interconnect. Do not
use DHCP naming for the public IP address or interconnects; you need static IP
addresses! The private interconnect should only be used by Oracle to transfer
Cluster Manager and Cache Fusion related data along with data for the network
storage server (Openfiler). Note that Oracle does not support using the public
network interface for interconnect. You must have one network interface for the
public network and another network interface for the private interconnect. For
a production RAC implementation, interconnect should be at least gigabit (or
more) and only be used by Oracle as well as having the network storage server
(Openfiler) on a separate gigabit network.
4.2 Configuring Public and Private Network
4.2 Configuring Public and Private Network
|
Using
the Network Configuration application, you need to configure both NIC
devices as well as the /etc/hosts file. Both of these tasks can be completed using
the Network Configuration GUI. Notice that the /etc/hosts settings are the same
for both nodes and that We removed any entry that has to do with IPv6 (for
example, ::1 localhost6.localdomain6 localhost6).
Our
example configuration will use the following settings: Oracle RAC Node 1 -
(linux1)
|
||||
Device
|
IP Address
|
Subnet
|
Gateway
|
Purpose
|
eth0
|
192.168.1.100
|
255.255.255.0
|
192.168.1.1
|
Connects linux1 to the public network
|
eth1
|
192.168.2.100
|
255.255.255.0
|
Connects linux1 (interconnect) to linux2 (linux2-priv)
|
|
/etc/hosts
|
||||
127.0.0.1
localhost.localdomain localhost
# Public Network - (eth0)
192.168.1.100
linux1
192.168.1.101 linux2
# Private Interconnect - (eth1)
192.168.2.100 linux1-priv
192.168.2.101
linux2-priv
# Public Virtual IP (VIP) addresses - (eth0:1)
192.168.1.200
linux1-vip
192.168.1.201
linux2-vip
# Private Storage Network for Openfiler - (eth1)
192.168.1.195
openfiler1
192.168.2.195
openfiler1-priv
|
||||
Oracle
RAC Node 2 - (linux2)
|
||||
Device
|
IP Address
|
Subnet
|
Gateway
|
Purpose
|
eth0
|
192.168.1.101
|
255.255.255.0
|
192.168.1.1
|
Connects linux2 to the public network
|
eth1
|
192.168.2.101
|
255.255.255.0
|
Connects linux2 (interconnect) to linux1 (linux1-priv)
|
|
/etc/hosts
|
||||
127.0.0.1
localhost.localdomain localhost
# Public Network - (eth0)
192.168.1.100
linux1
192.168.1.101 linux2
# Private Interconnect - (eth1)
192.168.2.100 linux1-priv
192.168.2.101
linux2-priv
# Public Virtual IP (VIP) addresses - (eth0:1)
192.168.1.200
linux1-vip
192.168.1.201
linux2-vip
# Private Storage Network for Openfiler - (eth1)
192.168.1.195
openfiler1
192.168.2.195
openfiler1-priv
|
||||
|
In
the screen shots below, only Oracle RAC Node 1 (linux1) is shown. Be sure to
make all the proper network settings to both Oracle RAC nodes.

Network Configuration Screen - Node 1 (linux1)
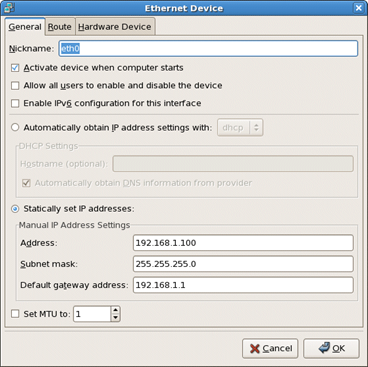
Ethernet Device Screen - eth0 (linux1)

Ethernet Device Screen - eth1 (linux1)
 Network Configuration Screen - /etc/hosts (linux1)
Once
the network is configured, you can use the ifconfig command to verify
everything is working. The following example is from linux1:
eth1 Link encap:Ethernet HWaddr 00:0E:0C:64:D1:E5
lo Link encap:Local Loopback
sit0 Link encap:IPv6-in-IPv4
4.3 About Virtual IP
4.4 Confirm the RAC Node Name is Not Listed in
Loopback Address

4.3 About Virtual IP
4.4 Confirm the RAC Node Name is Not Listed in Loopback Address
|
4.5 Confirm localhost is defined in the /etc/hosts file for the loopback address
Ensure
that the entry for localhost.localdomain and localhost are included for the
loopback address in the /etc/hosts file for each of the Oracle RAC nodes:
127.0.0.1 localhost.localdomain localhost
|
4.6 Adjusting Network Settings
With
Oracle 9.2.0.1 and later, Oracle makes use of UDP as the default protocol on
Linux for inter-process communication (IPC), such as Cache Fusion and Cluster
Manager buffer transfers between instances within the RAC cluster.
Oracle
strongly suggests to adjust the default and maximum receive buffer size
(SO_RCVBUF socket option) to 1024KB and the default and maximum send buffer
size (SO_SNDBUF socket option) to 256KB.
The
receive buffers are used by TCP and UDP to hold received data until it is read
by the application. The receive buffer cannot overflow because the peer is not
allowed to send data beyond the buffer size window. This means that datagrams
will be discarded if they don't fit in the socket receive buffer, potentially
causing the sender to overwhelm the receiver.
|
The
above commands made the changes to the already running OS. You should now make
the above changes permanent (for each reboot) by adding the following lines to
the /etc/sysctl.conf file for both nodes in your RAC cluster:
#
+---------------------------------------------------------+
#
| ADJUSTING NETWORK SETTINGS |
#
+---------------------------------------------------------+
#
| With Oracle 9.2.0.1 and onwards, Oracle now makes use |
#
| of UDP as the default protocol on Linux for |
#
| inter-process communication (IPC), such as Cache Fusion |
#
| and Cluster Manager buffer transfers between instances |
#
| within the RAC cluster. Oracle strongly suggests to |
#
| adjust the default and maximum receive buffer size |
#
| (SO_RCVBUF socket option) to 1024KB, and the default |
#
| and maximum send buffer size (SO_SNDBUF socket option) |
#
| to 256KB. The receive buffers are used by TCP and UDP |
#
| to hold received data until it is read by the |
#
| application. The receive buffer cannot overflow because |
#
| the peer is not allowed to send data beyond the buffer |
#
| size window. This means that datagrams will be |
#
| discarded if they don't fit in the socket receive |
#
| buffer. This could cause the sender to overwhelm the |
#
| receiver.
|
#
+---------------------------------------------------------+
#
+---------------------------------------------------------+
#
| Default setting in bytes of the socket "receive" buffer |
#
| which may be set by using the SO_RCVBUF socket option. |
#
+---------------------------------------------------------+
net.core.rmem_default=1048576
#
+---------------------------------------------------------+
#
| Maximum setting in bytes of the socket "receive" buffer |
#
| which may be set by using the SO_RCVBUF socket option. |
#
+---------------------------------------------------------+
net.core.rmem_max=1048576
#
+---------------------------------------------------------+
#
| Default setting in bytes of the socket "send" buffer |
#
| which may be set by using the SO_SNDBUF socket option. |
#
+---------------------------------------------------------+
net.core.wmem_default=262144
#
+---------------------------------------------------------+
#
| Maximum setting in bytes of the socket "send" buffer |
#
| which may be set by using the SO_SNDBUF socket option. |
#
+---------------------------------------------------------+
net.core.wmem_max=262144
4.7 Check and turn off UDP ICMP rejections:
During
the Linux installation process, We indicated to not configure the
firewall option. By default the option to configure
a firewall is selected by the installer. This has burned me several times so We
like to do a double check that the firewall option is not configured and to
ensure udp ICMP filtering is turned off.
If
UDP ICMP is blocked or rejected by the firewall, the Oracle Clusterware
software will crash after several minutes of running. When the Oracle
Clusterware process fails, you will have something similar to the following in
the _evmocr.log file:
08/29/2005
22:17:19
oac_init:2:
Could not connect to server, clsc retcode = 9
08/29/2005
22:17:19
a_init:12!:
Client init unsuccessful : [32]
ibctx:1:ERROR:
INVALID FORMAT
proprinit:problem
reading the bootblock or superbloc 22
When
experiencing this type of error, the solution is to remove the udp ICMP
(iptables) rejection rule - or to simply have the firewall option turned off.
The Oracle Clusterware software will then start to operate normally and not
crash. The following commands should be executed as the root user account:
1. Check
to ensure that the firewall option is turned off. If the firewall option is
stopped (like it is in my example below) you do not have to proceed with the
following steps.
2. # /etc/rc.d/init.d/iptables status
Firewall
is stopped.
3. If
the firewall option is operating you will need to first manually disable UDP
ICMP rejections:
4. #
/etc/rc.d/init.d/iptables stop
5.
6. Flushing
firewall rules: [ OK ]
7. Setting
chains to policy ACCEPT: filter [
OK ]
Unloading
iptables modules: [ OK ]
8. Then,
to turn UDP ICMP rejections off for next server reboot (which should always be
turned off):
#
chkconfig iptables off
To be continued ....... Read Part II
HAPPY LEARNING!
Thanks for the feedback dude, In fact this is so long that, I prepared this document first by collecting information from various blogs and MOS notes, then went ahead with trying it out, So finally hard work paid, but was too lazy to prepare a document of my own implementation(with my own screeshots), So you will find some locations and screeshots irrelavant, but you can easily replace them with yours while doing this activity. All the best buddy!
ReplyDelete